[{"id":"704","split":"1","chapterid":"3016","timeFrom":"0.0 ","timeTo":"163.099 ","number":"1","chaptername":"Colon intubation Trainer Mid-Transverse ","description":" ","tagid":"177","tagName":"Caecum (landmarks)"},{"id":"704","split":"1","chapterid":"3016","timeFrom":"0.0 ","timeTo":"163.099 ","number":"1","chaptername":"Colon intubation Trainer Mid-Transverse ","description":" ","tagid":"166","tagName":"Caecum"},{"id":"704","split":"1","chapterid":"3016","timeFrom":"0.0 ","timeTo":"163.099 ","number":"1","chaptername":"Colon intubation Trainer Mid-Transverse ","description":" ","tagid":"175","tagName":"Retroversion right colon"},{"id":"704","split":"1","chapterid":"3018","timeFrom":"241.333 ","timeTo":"309.866 ","number":"2","chaptername":"Polyp 1 : Characterisation ","description":" ","tagid":"751","tagName":"JNET 2A"},{"id":"704","split":"1","chapterid":"3018","timeFrom":"241.333 ","timeTo":"309.866 ","number":"2","chaptername":"Polyp 1 : Characterisation ","description":" ","tagid":"287","tagName":"Small (less than 10mm)"},{"id":"704","split":"1","chapterid":"3018","timeFrom":"241.333 ","timeTo":"309.866 ","number":"2","chaptername":"Polyp 1 : Characterisation ","description":" ","tagid":"323","tagName":"Paris 0-IIa"},{"id":"704","split":"1","chapterid":"3019","timeFrom":"309.867 ","timeTo":"364.266 ","number":"3","chaptername":"Polyp 1 : Best Practice Cold Snare Polypectomy ","description":" ","tagid":"245","tagName":"Cold Snare"},{"id":"704","split":"1","chapterid":"3019","timeFrom":"309.867 ","timeTo":"364.266 ","number":"3","chaptername":"Polyp 1 : Best Practice Cold Snare Polypectomy ","description":" ","tagid":"291","tagName":"Cold Snare Polypectomy"},{"id":"704","split":"1","chapterid":"3020","timeFrom":"364.267 ","timeTo":"554.199 ","number":"4","chaptername":"Best Practice CSP : Snare Placement Technique ","description":" ","tagid":"245","tagName":"Cold Snare"},{"id":"704","split":"1","chapterid":"3020","timeFrom":"364.267 ","timeTo":"554.199 ","number":"4","chaptername":"Best Practice CSP : Snare Placement Technique ","description":" ","tagid":"291","tagName":"Cold Snare Polypectomy"},{"id":"704","split":"1","chapterid":"3020","timeFrom":"364.267 ","timeTo":"554.199 ","number":"4","chaptername":"Best Practice CSP : Snare Placement Technique ","description":" ","tagid":"331","tagName":"Snare placement"},{"id":"704","split":"1","chapterid":"3020","timeFrom":"364.267 ","timeTo":"554.199 ","number":"4","chaptername":"Best Practice CSP : Snare Placement Technique ","description":" ","tagid":"332","tagName":"Wide margin principle"},{"id":"704","split":"1","chapterid":"3021","timeFrom":"554.2 ","timeTo":"620.666 ","number":"5","chaptername":"Best Practice CSP : Margin Examination ","description":" ","tagid":"335","tagName":"Defect inspection after CSP"},{"id":"704","split":"1","chapterid":"3021","timeFrom":"554.2 ","timeTo":"620.666 ","number":"5","chaptername":"Best Practice CSP : Margin Examination ","description":" ","tagid":"871","tagName":"Underwater Imaging Using a Transparent Cap"},{"id":"704","split":"1","chapterid":"3022","timeFrom":"620.667 ","timeTo":"657.532 ","number":"6","chaptername":"Advantages of a (Distal Transparent) Cap for Colonoscopy ","description":" ","tagid":"871","tagName":"Underwater Imaging Using a Transparent Cap"},{"id":"704","split":"1","chapterid":"3023","timeFrom":"657.533 ","timeTo":"718.899 ","number":"7","chaptername":"Appearances of Polypectomy Site 3 Weeks Later ","description":" ","tagid":"272","tagName":"Post polypectomy defect assessment"},{"id":"704","split":"1","chapterid":"3024","timeFrom":"718.9","timeTo":"1012.066","number":"9","chaptername":"Polyp 2 : Characterisation and Stabilisation at 6 o'clock","description":"","tagid":"287","tagName":"Small (less than 10mm)"},{"id":"704","split":"1","chapterid":"3024","timeFrom":"718.9","timeTo":"1012.066","number":"9","chaptername":"Polyp 2 : Characterisation and Stabilisation at 6 o'clock","description":"","tagid":"751","tagName":"JNET 2A"},{"id":"704","split":"1","chapterid":"3024","timeFrom":"718.9","timeTo":"1012.066","number":"9","chaptername":"Polyp 2 : Characterisation and Stabilisation at 6 o'clock","description":"","tagid":"325","tagName":"Paris 0-Is"},{"id":"704","split":"1","chapterid":"3024","timeFrom":"718.9","timeTo":"1012.066","number":"9","chaptername":"Polyp 2 : Characterisation and Stabilisation at 6 o'clock","description":"","tagid":"245","tagName":"Cold Snare"},{"id":"704","split":"1","chapterid":"3024","timeFrom":"718.9","timeTo":"1012.066","number":"9","chaptername":"Polyp 2 : Characterisation and Stabilisation at 6 o'clock","description":"","tagid":"330","tagName":"Use of submucosal injection"},{"id":"704","split":"1","chapterid":"3025","timeFrom":"1012.067 ","timeTo":"1088.466 ","number":"9","chaptername":"Polyp 2 : Injection Technique ","description":" ","tagid":"269","tagName":"Injection technique"},{"id":"704","split":"1","chapterid":"3025","timeFrom":"1012.067 ","timeTo":"1088.466 ","number":"9","chaptername":"Polyp 2 : Injection Technique ","description":" ","tagid":"330","tagName":"Use of submucosal injection"},{"id":"704","split":"1","chapterid":"3025","timeFrom":"1012.067 ","timeTo":"1088.466 ","number":"9","chaptername":"Polyp 2 : Injection Technique ","description":" ","tagid":"453","tagName":"Dynamic injection"},{"id":"704","split":"1","chapterid":"3025","timeFrom":"1012.067 ","timeTo":"1088.466 ","number":"9","chaptername":"Polyp 2 : Injection Technique ","description":" ","tagid":"454","tagName":"Stab and pull back to find submucosal plane"},{"id":"704","split":"1","chapterid":"3026","timeFrom":"1088.467 ","timeTo":"1345.832 ","number":"10","chaptername":"Polyp 2 : Snare Placement Technique ","description":" ","tagid":"245","tagName":"Cold Snare"},{"id":"704","split":"1","chapterid":"3026","timeFrom":"1088.467 ","timeTo":"1345.832 ","number":"10","chaptername":"Polyp 2 : Snare Placement Technique ","description":" ","tagid":"291","tagName":"Cold Snare Polypectomy"},{"id":"704","split":"1","chapterid":"3026","timeFrom":"1088.467 ","timeTo":"1345.832 ","number":"10","chaptername":"Polyp 2 : Snare Placement Technique ","description":" ","tagid":"331","tagName":"Snare placement"},{"id":"704","split":"1","chapterid":"3026","timeFrom":"1088.467 ","timeTo":"1345.832 ","number":"10","chaptername":"Polyp 2 : Snare Placement Technique ","description":" ","tagid":"333","tagName":"Endoscope positioning"},{"id":"704","split":"1","chapterid":"3026","timeFrom":"1088.467 ","timeTo":"1345.832 ","number":"10","chaptername":"Polyp 2 : Snare Placement Technique ","description":" ","tagid":"338","tagName":"Piecemeal CSP"},{"id":"704","split":"1","chapterid":"3027","timeFrom":"1345.833 ","timeTo":"1606.599 ","number":"11","chaptername":"Polyp 2 : Incomplete Resection Switch to Piecemeal ","description":" ","tagid":"338","tagName":"Piecemeal CSP"},{"id":"704","split":"1","chapterid":"3027","timeFrom":"1345.833 ","timeTo":"1606.599 ","number":"11","chaptername":"Polyp 2 : Incomplete Resection Switch to Piecemeal ","description":" ","tagid":"333","tagName":"Endoscope positioning"},{"id":"704","split":"1","chapterid":"3027","timeFrom":"1345.833 ","timeTo":"1606.599 ","number":"11","chaptername":"Polyp 2 : Incomplete Resection Switch to Piecemeal ","description":" ","tagid":"331","tagName":"Snare placement"},{"id":"704","split":"1","chapterid":"3027","timeFrom":"1345.833 ","timeTo":"1606.599 ","number":"11","chaptername":"Polyp 2 : Incomplete Resection Switch to Piecemeal ","description":" ","tagid":"291","tagName":"Cold Snare Polypectomy"},{"id":"704","split":"1","chapterid":"3027","timeFrom":"1345.833 ","timeTo":"1606.599 ","number":"11","chaptername":"Polyp 2 : Incomplete Resection Switch to Piecemeal ","description":" ","tagid":"245","tagName":"Cold Snare"},{"id":"704","split":"1","chapterid":"3028","timeFrom":"1606.6 ","timeTo":"1678.366 ","number":"12","chaptername":"Polyp 2 : Trainer Takeover ","description":" ","tagid":"245","tagName":"Cold Snare"},{"id":"704","split":"1","chapterid":"3028","timeFrom":"1606.6 ","timeTo":"1678.366 ","number":"12","chaptername":"Polyp 2 : Trainer Takeover ","description":" ","tagid":"291","tagName":"Cold Snare Polypectomy"},{"id":"704","split":"1","chapterid":"3028","timeFrom":"1606.6 ","timeTo":"1678.366 ","number":"12","chaptername":"Polyp 2 : Trainer Takeover ","description":" ","tagid":"332","tagName":"Wide margin principle"},{"id":"704","split":"1","chapterid":"3028","timeFrom":"1606.6 ","timeTo":"1678.366 ","number":"12","chaptername":"Polyp 2 : Trainer Takeover ","description":" ","tagid":"338","tagName":"Piecemeal CSP"},{"id":"704","split":"1","chapterid":"3028","timeFrom":"1606.6 ","timeTo":"1678.366 ","number":"12","chaptername":"Polyp 2 : Trainer Takeover ","description":" ","tagid":"331","tagName":"Snare placement"},{"id":"704","split":"1","chapterid":"3029","timeFrom":"1678.367 ","timeTo":"1884.232 ","number":"13","chaptername":"Polyp 2 : Defect Assessment ","description":" ","tagid":"329","tagName":"Snare selection"},{"id":"704","split":"1","chapterid":"3030","timeFrom":"1884.233 ","timeTo":"2248.899 ","number":"14","chaptername":"Polyp 3 : Assessment and Resection ","description":" ","tagid":"321","tagName":"Paris 0-Ip"},{"id":"704","split":"1","chapterid":"3030","timeFrom":"1884.233 ","timeTo":"2248.899 ","number":"14","chaptername":"Polyp 3 : Assessment and Resection ","description":" ","tagid":"751","tagName":"JNET 2A"},{"id":"704","split":"1","chapterid":"3030","timeFrom":"1884.233 ","timeTo":"2248.899 ","number":"14","chaptername":"Polyp 3 : Assessment and Resection ","description":" ","tagid":"245","tagName":"Cold Snare"},{"id":"704","split":"1","chapterid":"3030","timeFrom":"1884.233 ","timeTo":"2248.899 ","number":"14","chaptername":"Polyp 3 : Assessment and Resection ","description":" ","tagid":"287","tagName":"Small (less than 10mm)"},{"id":"704","split":"1","chapterid":"3030","timeFrom":"1884.233 ","timeTo":"2248.899 ","number":"14","chaptername":"Polyp 3 : Assessment and Resection ","description":" ","tagid":"291","tagName":"Cold Snare Polypectomy"},{"id":"704","split":"1","chapterid":"3030","timeFrom":"1884.233 ","timeTo":"2248.899 ","number":"14","chaptername":"Polyp 3 : Assessment and Resection ","description":" ","tagid":"331","tagName":"Snare placement"},{"id":"704","split":"1","chapterid":"3030","timeFrom":"1884.233 ","timeTo":"2248.899 ","number":"14","chaptername":"Polyp 3 : Assessment and Resection ","description":" ","tagid":"568","tagName":"Cold Snare Protrusion"},{"id":"704","split":"1","chapterid":"3031","timeFrom":"2248.9 ","timeTo":"2488.099 ","number":"15","chaptername":"Polyp 4 : Pedunculated Sigmoid Polyp : Technique? ","description":" ","tagid":"321","tagName":"Paris 0-Ip"},{"id":"704","split":"1","chapterid":"3031","timeFrom":"2248.9 ","timeTo":"2488.099 ","number":"15","chaptername":"Polyp 4 : Pedunculated Sigmoid Polyp : Technique? ","description":" ","tagid":"751","tagName":"JNET 2A"},{"id":"704","split":"1","chapterid":"3031","timeFrom":"2248.9 ","timeTo":"2488.099 ","number":"15","chaptername":"Polyp 4 : Pedunculated Sigmoid Polyp : Technique? ","description":" ","tagid":"444","tagName":"Choice of snare type"},{"id":"704","split":"1","chapterid":"3031","timeFrom":"2248.9 ","timeTo":"2488.099 ","number":"15","chaptername":"Polyp 4 : Pedunculated Sigmoid Polyp : Technique? ","description":" ","tagid":"446","tagName":"Hot versus cold snare polypectomy"},{"id":"704","split":"1","chapterid":"3032","timeFrom":"2488.1 ","timeTo":"2769.632 ","number":"16","chaptername":"Polyp 4 : Flexible Nylon Loop Placement Technique ","description":" ","tagid":"426","tagName":"EndoLoop"},{"id":"704","split":"1","chapterid":"3032","timeFrom":"2488.1 ","timeTo":"2769.632 ","number":"16","chaptername":"Polyp 4 : Flexible Nylon Loop Placement Technique ","description":" ","tagid":"521","tagName":"Mechanical ligation - nylon polyloop"},{"id":"704","split":"1","chapterid":"3032","timeFrom":"2488.1 ","timeTo":"2769.632 ","number":"16","chaptername":"Polyp 4 : Flexible Nylon Loop Placement Technique ","description":" ","tagid":"523","tagName":"Placement of a polyloop"},{"id":"704","split":"1","chapterid":"3033","timeFrom":"2769.633 ","timeTo":"2861.366 ","number":"17","chaptername":"Polyp 4 : Nursing Loop Deployment Technique ","description":" ","tagid":"426","tagName":"EndoLoop"},{"id":"704","split":"1","chapterid":"3033","timeFrom":"2769.633 ","timeTo":"2861.366 ","number":"17","chaptername":"Polyp 4 : Nursing Loop Deployment Technique ","description":" ","tagid":"521","tagName":"Mechanical ligation - nylon polyloop"},{"id":"704","split":"1","chapterid":"3033","timeFrom":"2769.633 ","timeTo":"2861.366 ","number":"17","chaptername":"Polyp 4 : Nursing Loop Deployment Technique ","description":" ","tagid":"523","tagName":"Placement of a polyloop"},{"id":"704","split":"1","chapterid":"3034","timeFrom":"2861.367 ","timeTo":"3160.899 ","number":"18","chaptername":"Polyp 4 : Attempt at Snare Placement ","description":" ","tagid":"179","tagName":"Patient Position"},{"id":"704","split":"1","chapterid":"3034","timeFrom":"2861.367 ","timeTo":"3160.899 ","number":"18","chaptername":"Polyp 4 : Attempt at Snare Placement ","description":" ","tagid":"522","tagName":"Gravity to improve stalk access"},{"id":"704","split":"1","chapterid":"3035","timeFrom":"3160.9 ","timeTo":"3236.666 ","number":"19","chaptername":"Polyp 4 : Definitive Snare Placement ","description":" ","tagid":"524","tagName":"Placement of snare over the stalk"},{"id":"704","split":"1","chapterid":"3036","timeFrom":"3236.667 ","timeTo":"3321.932 ","number":"20","chaptername":"Polyp 4 : Snare Closure above Loop ","description":" ","tagid":"292","tagName":"Hot snare polypectomy without lifting"},{"id":"704","split":"1","chapterid":"3038","timeFrom":"3416.2 ","timeTo":"4076.299 ","number":"22","chaptername":"Debrief : Sarah ","description":" ","tagid":"179","tagName":"Patient Position"},{"id":"704","split":"1","chapterid":"3038","timeFrom":"3416.2 ","timeTo":"4076.299 ","number":"22","chaptername":"Debrief : Sarah ","description":" ","tagid":"333","tagName":"Endoscope positioning"},{"id":"704","split":"1","chapterid":"3038","timeFrom":"3416.2 ","timeTo":"4076.299 ","number":"22","chaptername":"Debrief : Sarah ","description":" ","tagid":"859","tagName":"4 Ps - Position"},{"id":"704","split":"1","chapterid":"3038","timeFrom":"3416.2 ","timeTo":"4076.299 ","number":"22","chaptername":"Debrief : Sarah ","description":" ","tagid":"269","tagName":"Injection technique"},{"id":"704","split":"1","chapterid":"3038","timeFrom":"3416.2 ","timeTo":"4076.299 ","number":"22","chaptername":"Debrief : Sarah ","description":" ","tagid":"331","tagName":"Snare placement"},{"id":"704","split":"1","chapterid":"3038","timeFrom":"3416.2 ","timeTo":"4076.299 ","number":"22","chaptername":"Debrief : Sarah ","description":" ","tagid":"523","tagName":"Placement of a polyloop"},{"id":"704","split":"1","chapterid":"3038","timeFrom":"3416.2 ","timeTo":"4076.299 ","number":"22","chaptername":"Debrief : Sarah ","description":" ","tagid":"745","tagName":"Assessment of Trainee"},{"id":"704","split":"1","chapterid":"3038","timeFrom":"3416.2 ","timeTo":"4076.299 ","number":"22","chaptername":"Debrief : Sarah ","description":" ","tagid":"247","tagName":"Assessment"}]
[{"name":"Basic Polypectomy Course : Case 2","description":"Case of Multiple Cold Snare Polypectomies and a Large Sigmoid Pedunculated Polyp. Performed by trainees with performance enhancing feedback and debrief.","summary":"
This video emphasized the importance of accurate use and snare positioning during procedures. Utilizing visualization techniques, such as the 'underwater' method, and conducting post-procedure review to identify areas for improvement were discussed. Moreover, it underscores the significance of teamwork and effective communication in conducting successful polypectomy. This learning aims to improve practice and enhance patient outcomes in future procedures.<\/span><\/p>","detailedSummary":"
Here is a list of key learning points from the video:<\/span><\/h6>\n
\n
Proper Snare Closure: The conversation stressed the importance of proper snare manipulation during procedures. One specific instruction discussed was ensuring all the polyp margins and a rim of normal tissue remain closed inside the snare.<\/li>\n
Techniques for Snare Manipulation: Detailed explanations were given on techniques for positioning the snare correctly, specifically involving push-pull movements. It was emphasized that understanding how to maneuver the snare is crucial to the procedure's success.<\/span><\/li>\n
Importance of Precise Snare Positioning: The video highlighted the importance of getting the snare into the correct “6 o’clock” position relative to the polyp.<\/span><\/li>\n
Accurate Evaluation Post-Polypectomy: This step needs to be executed precisely to prevent incomplete procedures.<\/span><\/li>\n
The Role of Visualization Techniques: The underwater visualization was suggested to enhance assessment of the polyp and the defect.<\/span><\/li>\n
Endoloop Positioning: Correct positioning of the endoloop plays a crucial role in successful pedunculated polyp polypectomy.<\/span><\/li>\n
Value of Continuous Learning and Improvement: The video underscored the need for ongoing learning to improve practice and outcomes.<\/span><\/li>\n
Necessity of Post-Procedural Review: The video affirmed the need for post-procedure review and discussion to identify areas of improvement and consolidate learning.<\/span><\/li>\n
Effective Teamwork and Communication: The video implied the importance of clear communication and collaboration between team members during medical procedures.<\/span><\/li>\n<\/ul>\n
<\/p>","author":"David Tate","tagger":"1","editor":"1","recorder":"9","authorid":"1","centreName":"University Hospital of Ghent","centreCity":"Ghent","centreCountry":"Belgium"}]
[{"chapterTagid":"5867","tagName":"4 Ps - Position","id":"859"},{"chapterTagid":"5872","tagName":"Assessment","id":"247"},{"chapterTagid":"5871","tagName":"Assessment of Trainee","id":"745"},{"chapterTagid":"5801","tagName":"Caecum","id":"166"},{"chapterTagid":"5800","tagName":"Caecum (landmarks)","id":"177"},{"chapterTagid":"5852","tagName":"Choice of snare type","id":"444"},{"chapterTagid":"5806","tagName":"Cold Snare","id":"245"},{"chapterTagid":"5807","tagName":"Cold Snare Polypectomy","id":"291"},{"chapterTagid":"5849","tagName":"Cold Snare Protrusion","id":"568"},{"chapterTagid":"5812","tagName":"Defect inspection after CSP","id":"335"},{"chapterTagid":"5825","tagName":"Dynamic injection","id":"453"},{"chapterTagid":"5854","tagName":"EndoLoop","id":"426"},{"chapterTagid":"5830","tagName":"Endoscope positioning","id":"333"},{"chapterTagid":"5862","tagName":"Gravity to improve stalk access","id":"522"},{"chapterTagid":"5864","tagName":"Hot snare polypectomy without lifting","id":"292"},{"chapterTagid":"5853","tagName":"Hot versus cold snare polypectomy","id":"446"},{"chapterTagid":"5823","tagName":"Injection technique","id":"269"},{"chapterTagid":"5804","tagName":"JNET 2A","id":"751"},{"chapterTagid":"5858","tagName":"Mechanical ligation - nylon polyloop","id":"521"},{"chapterTagid":"5816","tagName":"Paris 0-IIa","id":"323"},{"chapterTagid":"5843","tagName":"Paris 0-Ip","id":"321"},{"chapterTagid":"5819","tagName":"Paris 0-Is","id":"325"},{"chapterTagid":"5861","tagName":"Patient Position","id":"179"},{"chapterTagid":"5831","tagName":"Piecemeal CSP","id":"338"},{"chapterTagid":"5859","tagName":"Placement of a polyloop","id":"523"},{"chapterTagid":"5863","tagName":"Placement of snare over the stalk","id":"524"},{"chapterTagid":"5815","tagName":"Post polypectomy defect assessment","id":"272"},{"chapterTagid":"5802","tagName":"Retroversion right colon","id":"175"},{"chapterTagid":"5805","tagName":"Small (less than 10mm)","id":"287"},{"chapterTagid":"5810","tagName":"Snare placement","id":"331"},{"chapterTagid":"5842","tagName":"Snare selection","id":"329"},{"chapterTagid":"5826","tagName":"Stab and pull back to find submucosal plane","id":"454"},{"chapterTagid":"5814","tagName":"Underwater Imaging Using a Transparent Cap","id":"871"},{"chapterTagid":"5821","tagName":"Use of submucosal injection","id":"330"},{"chapterTagid":"5811","tagName":"Wide margin principle","id":"332"}]
Case of Multiple Cold Snare Polypectomies and a Large Sigmoid Pedunculated Polyp. Performed by trainees with performance enhancing feedback and debrief.
This video emphasized the importance of accurate use and snare positioning during procedures. Utilizing visualization techniques, such as the 'underwater' method, and conducting post-procedure review to identify areas for improvement were discussed. Moreover, it underscores the significance of teamwork and effective communication in conducting successful polypectomy. This learning aims to improve practice and enhance patient outcomes in future procedures.
Detailed Summary
Here is a list of key learning points from the video:
Proper Snare Closure: The conversation stressed the importance of proper snare manipulation during procedures. One specific instruction discussed was ensuring all the polyp margins and a rim of normal tissue remain closed inside the snare.
Techniques for Snare Manipulation: Detailed explanations were given on techniques for positioning the snare correctly, specifically involving push-pull movements. It was emphasized that understanding how to maneuver the snare is crucial to the procedure's success.
Importance of Precise Snare Positioning: The video highlighted the importance of getting the snare into the correct “6 o’clock” position relative to the polyp.
Accurate Evaluation Post-Polypectomy: This step needs to be executed precisely to prevent incomplete procedures.
The Role of Visualization Techniques: The underwater visualization was suggested to enhance assessment of the polyp and the defect.
Endoloop Positioning: Correct positioning of the endoloop plays a crucial role in successful pedunculated polyp polypectomy.
Value of Continuous Learning and Improvement: The video underscored the need for ongoing learning to improve practice and outcomes.
Necessity of Post-Procedural Review: The video affirmed the need for post-procedure review and discussion to identify areas of improvement and consolidate learning.
Effective Teamwork and Communication: The video implied the importance of clear communication and collaboration between team members during medical procedures.
Registration will open in late January 2020. Prior to this you
can register your interest below and we will keep you updated on everything GIEQs.Your email address will only be used to update you on GIEQs
Join us for GIEQs II
Released prior to the early bird deadline these 6, 1-2 minute video
snippets
demonstrate the attention to detail, deconstructed approach and rock solid evidence
base of the GIEQs Approach.
1 - Over the Scope Clip for Upper
Gastrointestinal Bleeding Use of
OTSC as first-line for life
threatening upper gastrointestinal haemorrhage.
2 - Early Gastric Cancer Can you
identify and characterise
this early gastric cancer? Watch the video for more information
including endoscopic resectability
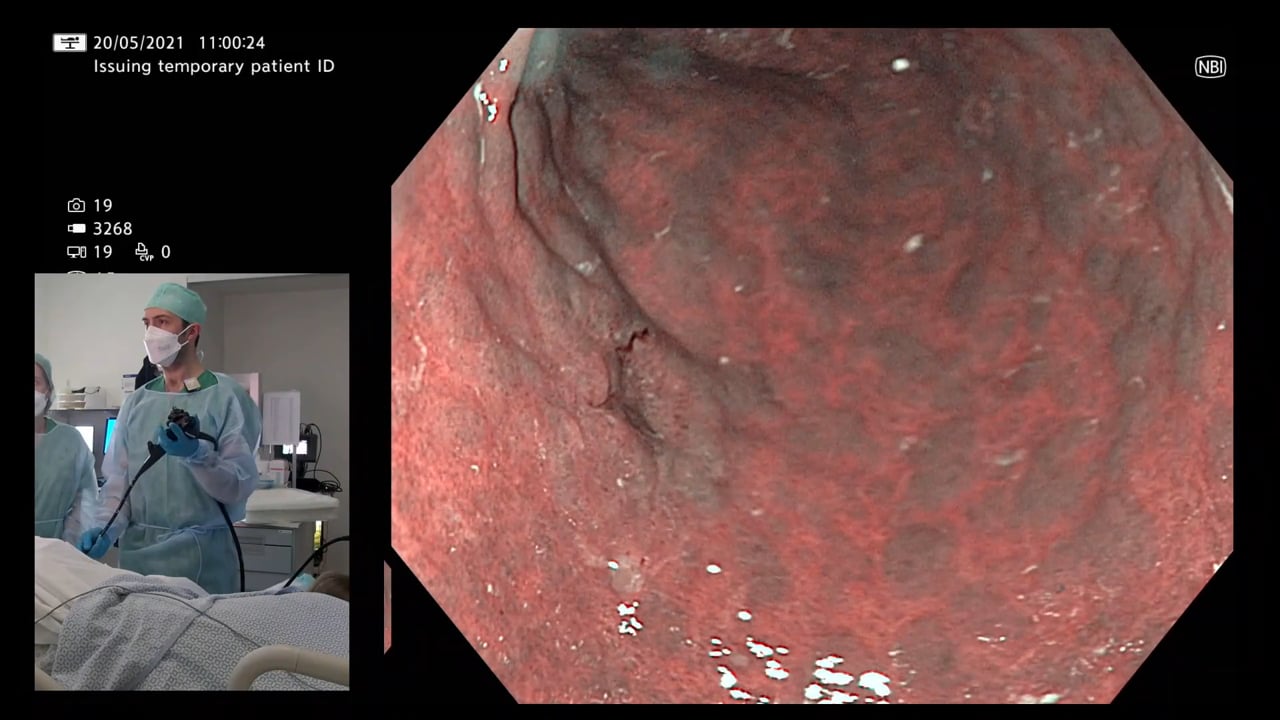
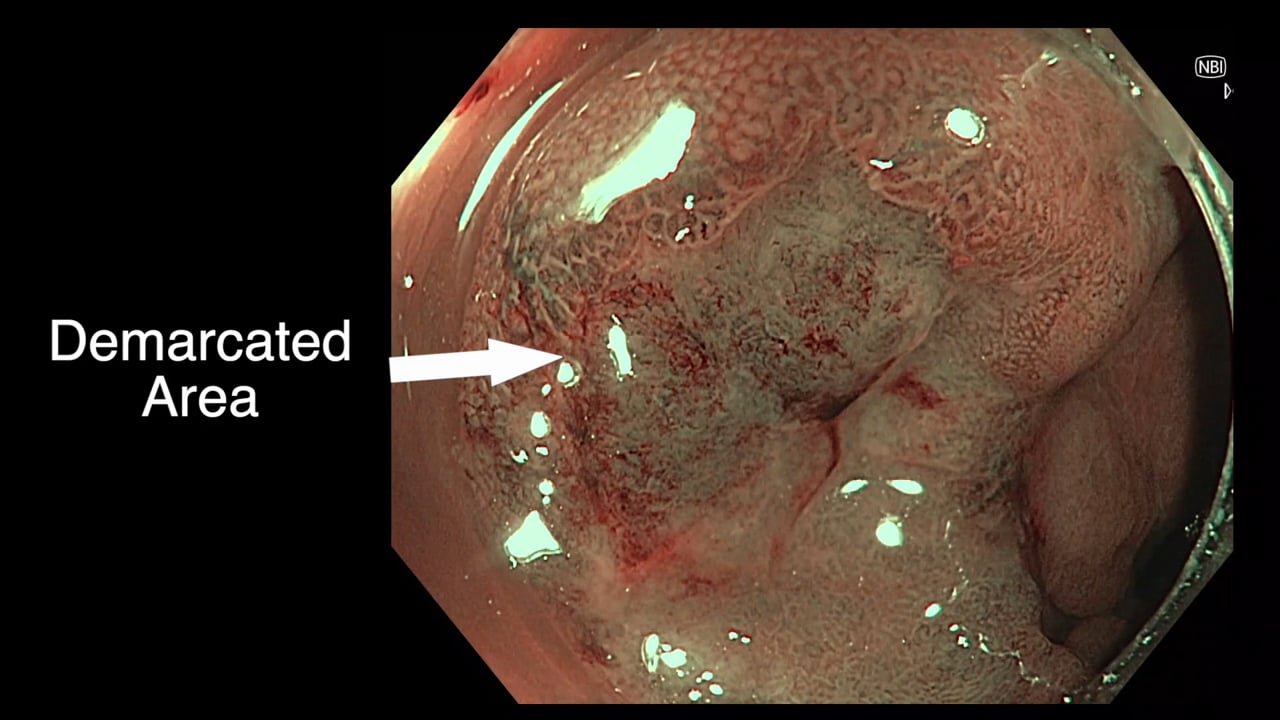
3 - The Demarcated Area as a Predictor of
Submucosal Invasion in Colon Polyps the Demarcated Area has emerged as a stable predictor
of submucosal invasive cancer. Find out more here.
4 - Dealing with Adverse Events at Colonic
Polypectomy
To be able to competently perform colonic polypectomy you must be able
to deal with adverse events. A deconstructed example is shown
here.
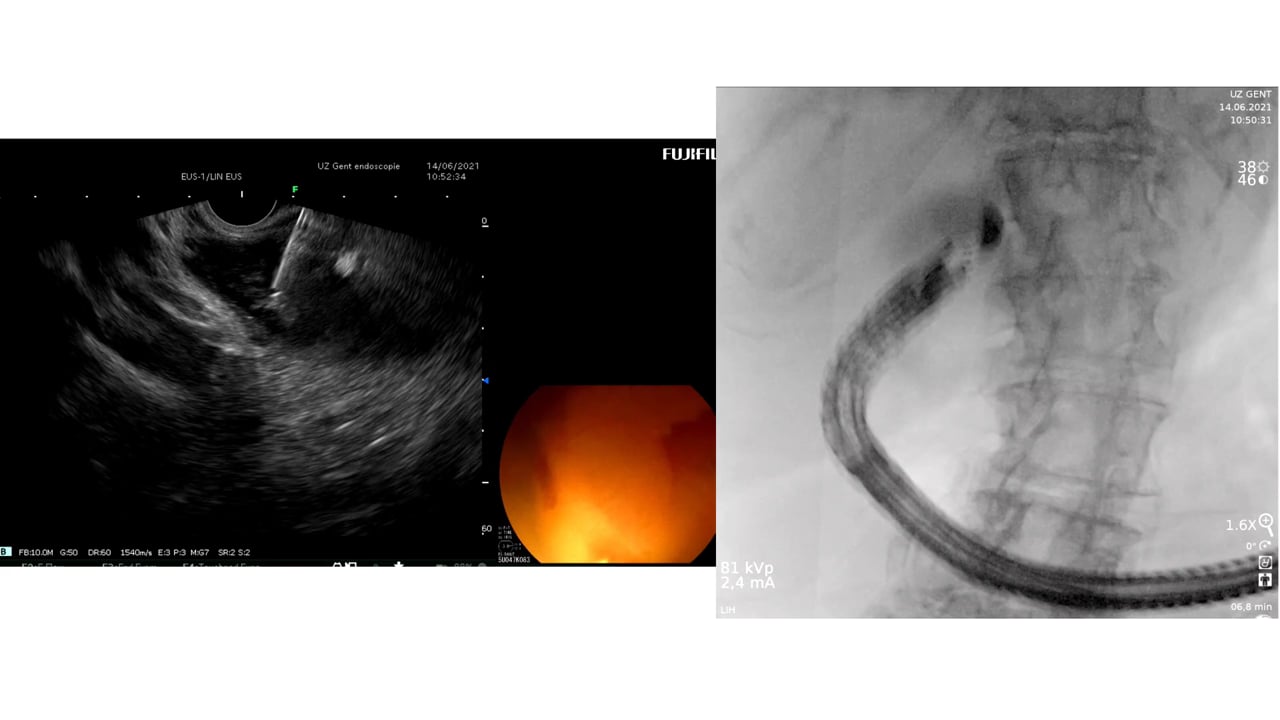
5 - Complex EUS applications to make Everyday
ERCP easier Endoscopic Ultrasound
is radically changing the way we approach biliary intervention and can
make a difference to everyday endoscopic problems.
6 - Decision Making after Large perforation and
life threatening Bleeding during Polypectomy Many of the GIEQs faculty spend their normal working
lives on complex endoscopy. Learning the lessons and approach from these
procedures, deconstructing them and bringing them to the everyday is a
crucial part of the GIEQs approach.